Quick-start
Wanna skip the fluff?
Useful commands
espflash flash riscv32imc-esp-espidf/release/build-output --monitorIntroduction
The ESP32-C3 contains a 32 bit RISC-V micro-controller. It can run at 160 MHz!
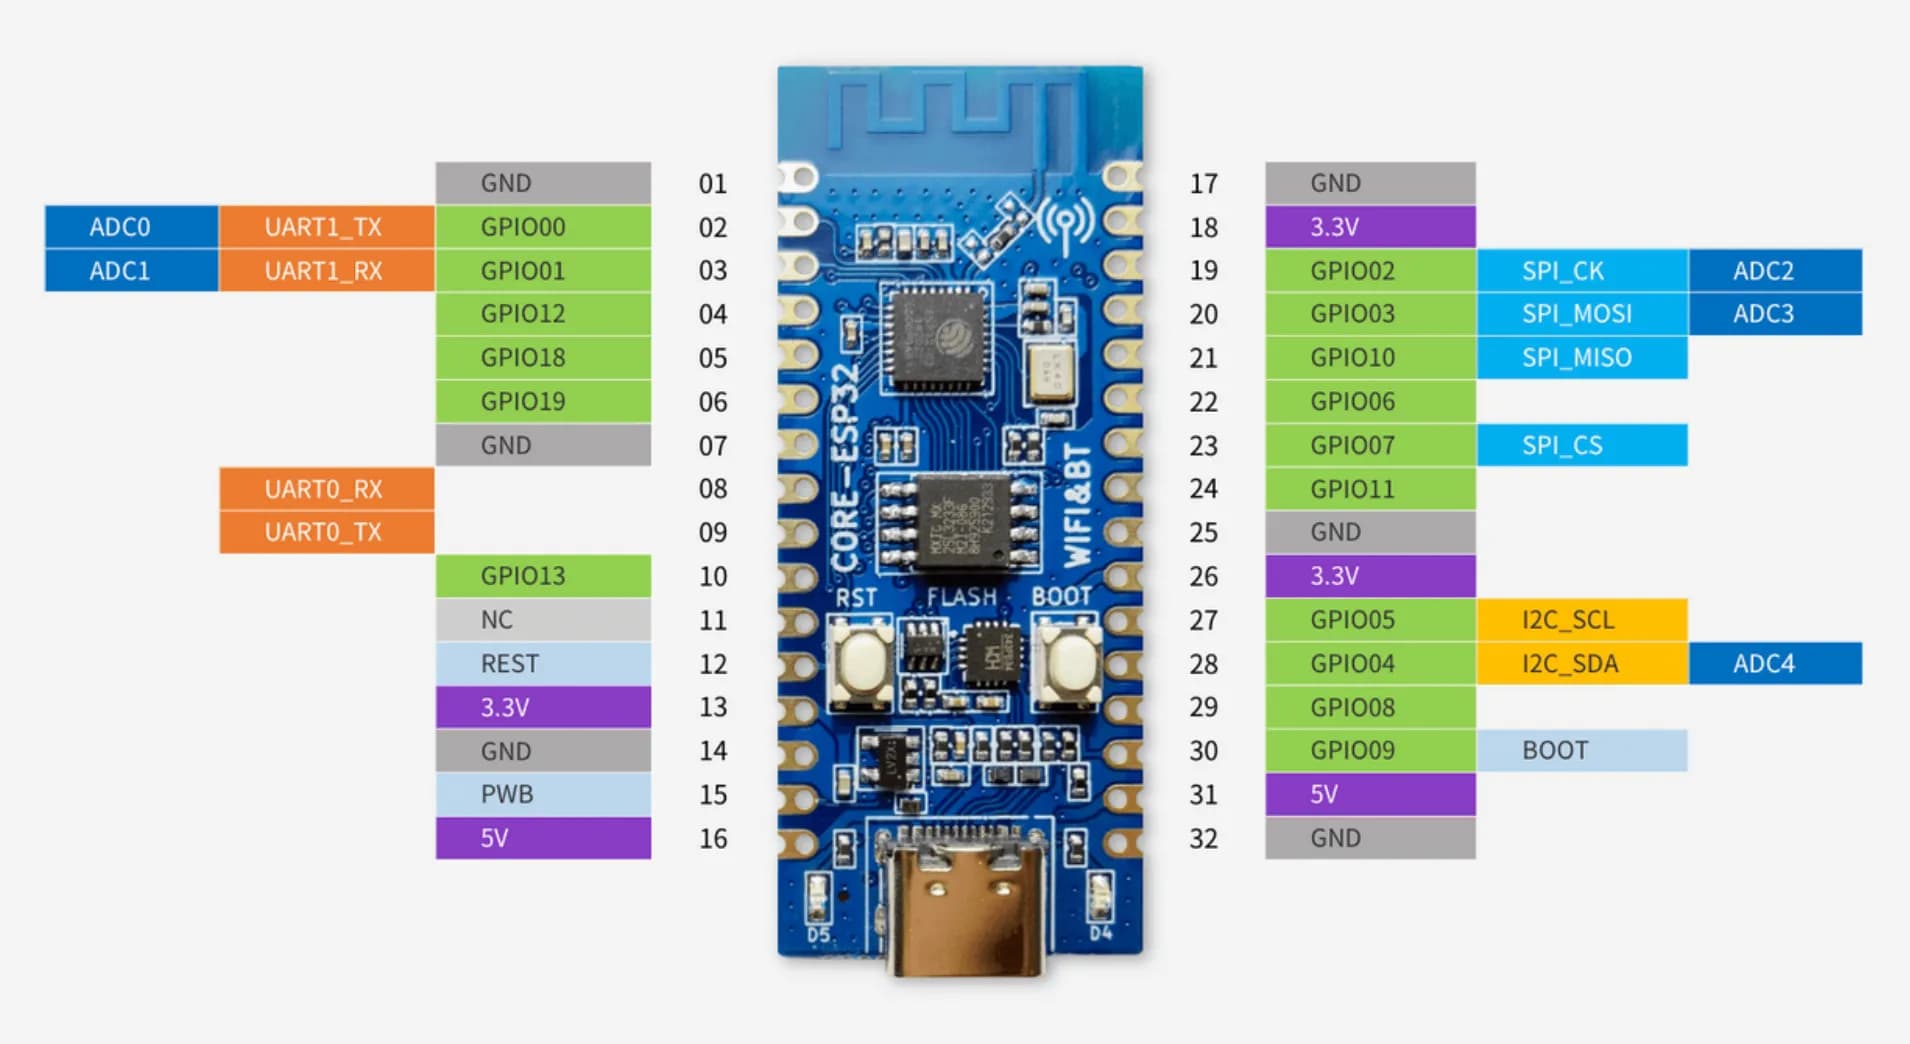
Let’s take a look at the pin-out…

Comparison vs. Arduino Mega 2506
Here’s a comparison between the two traditional development boards you can pick up.
| ESP32-C3 | Arduino Mega 2506 |
|---|---|
| 160 MHz | 16 MHz |
| USB-C | USB-B |
| 19 digital pins | 54 digital pins |
| 4 PWM pins | 15 PWM pins |
| 0 analog inputs | 16 analog inputs |
| 2(?) UARTs | 4 UARTs |
| ✅ Bluetooth | ❌ Bluetooth |
| 400 KB SRAM | 8 KB SRAM |
Why should we care about this comparison? Well, for the price of one arduino mega, you can pick up about 8 esp32c3’s, of the same model as pictured in the pinout, by luatOS, or 4 esp32c3 devkits, which are the more official boards from espressif.
The mega has a very good / mature community with lots of packages that can help make developing embedded systems a breeze. As a retrospective for all this work, I think it’d be a good idea to prototype things in an Arduino Mega, and then port over functionality into something smaller like an ESP, if possible, once a majority of the physical hardware architecture has been solved.
I took on the challenge of working with the ESP, because I’ve worked with embedded rust on a Raspberry Pi Pico before, and I don’t like to do things the easy way.
Could I have made a lot more progress a lot faster with the Arduino? Yes. Would I have learned as much as I did? Most definitely not.
Beginning development on an ESP32
The rust on ESP book is an excellent place to start.
There’s a recommendation on the site to use either VSCode or Wokwi extension. VSCode apparently has dev containers that can compile your code. I had some issues getting a successful compilation using the VSCode dev containers extension.
The esp-idf-hal template also provides a Dockerfile. With that dockerfile, you can run a docker container, mount it with your esp code, and build it in place, for that repository. As of writing this blog post (April 23, 2024), there were some issues with proc-macro2 crate, which required locking the crate version to an earlier version. I ran into some issues compiling past that point, seeing an error like this issue.
I realize now at the time of writing this blog that I didn’t pass in -Z build-std to cargo, but the esp book claims this shouldnt be necessary if you generate with a template. Needless to say, the Dockerfile ended up being a no-go too.
I got stuck in a loop for a while, trying out different projects to see if any of them would compile on my macbook. Big shoutout to this repository, which I was able to compile and test, but we’ll get to that.
After a bunch of trial an error, I found that the most reliable method of building was on Linux. (who would have guessed). Once I switched over to a Linux VM, I was able to follow the esp-book instructions to install the proper dependencies, and easily compile the test projects I was using. I wanted to compile and serve the binary files on my local network, which ended up being its own rabbit hole…
On CI / CD and SCM…
Everybody loves Github right? I love Github a whole ton. It really is the greatest website a software dev could learn to use. And Git workflow in general is EXTREMELY important. I always stress the importance of learning how to use it with my students.
Well, Github is great, but as much as possible, if I am leveraging a tool, I want to own that tool. I don’t want to be paying out of my pocket for a Github license. As far as I know, a team license doesn’t give you the ability to host a Github instance on-prem. For this, you’d need the Github enterprise license, which ends up coming out to 240 / user per year.
I already have a premium github account, but I just want to have more control over my system.
Enter forgejo.
This SCM tool is open-source and is pretty easy to self host. The problem is that it’s lacking maturity. It’s something I plan to make a blog post about, but only after I get it fully functional.
The current status of my forgejo instance is as follows:
- No public routing, strictly local network access only
- SSH not configured properly, making pushing difficult
- No HTTPS certificate means no encrypted traffic
Despite these limitations, I found forgejo to have the features I needed a lot more readily available than something like a self-hosted gitlab instance. One thing that was a piece of cake to set up was mirroring my repository from Github to Forgejo.
This is what I was thinking: I can get the repository mirrored over to my forgejo, and have some CI / CD which creates the files I need to flash my esp.
You may be asking yourself: Why oh why are you going through this much trouble when the esp template generates a Github actions workflow for you???
The simple answer is this: I forgor 💀
No, seriously, I’d spent a weekend trying to figure out how to compile on my local computer, without some weird service like Wokwi (which you need to login to use, FYI), or building in a docker container (which I tried). And also, who doesn’t like the idea of owning their SCM and CI / CD?
Yes, this whole experience can probably be chalked up to ‘skill issues’, but I haven’t even gotten to the stuff I learned that I feel like was kind of cool.
Ok, so, back to the subject, I tried to get the forgejo CI / CD working. Setting up a runner is actually pretty easy. Here’s the runner instrumentation instructions
Now, back to the part where I forgot we’re given github actions for the free… I tried developing my own actions script for Forgejo.
I basically hit a deadlock. Despite using the circleCI rust/node image, using the forgejo action to checkout the code causes a crash in the pipeline. NOT using the rust/node image and strictly using a node one, and then installing rust, has its own difficulties. For some reason, installing rust in the CI doesn’t install rustup, making it… difficult to install toolchains and components.
Ok… so that didn’t work. Welp, I went back to the drawing board… re-read the docs, and tried starting another project from scratch.
(this is the part where I remembered we get the actions workflow in the template)
yeah… woops.
So, despite being spoon-fed this workflow, I did have to make some modifications to it. Here’s a non-exhaustive list, with the cargo toml, and workflow files, for reference:
- Adjust workflow file so nightly version is pinned
- Install LDProxy, rustfmt, and clippy
- Upload ESP target folder after
cargo buildusingactions/upload-artifact - Add some conditionals so certain steps don’t run in certain matrix configs
Please, if there’s something I missed or some config that could be improved, feel free to push a Pull Request to my repository
name: Continuous Integration

on:
  push:
    paths-ignore:
      - "**/README.md"
  pull_request:
  workflow_dispatch:

env:
  CARGO_TERM_COLOR: always
  GITHUB_TOKEN: ${{ secrets.GITHUB_TOKEN }}

jobs:
  rust-checks:
    name: Rust Checks
    runs-on: ubuntu-latest
    strategy:
      fail-fast: false
      matrix:
        action:
          - command: build
            args: --release
          - command: fmt
            args: --all -- --check --color always
          - command: clippy
            args: --all-features --workspace -- -D warnings
    steps:
      - name: Checkout repository
        uses: actions/checkout@v4
      - name: Setup Rust
        uses: dtolnay/rust-toolchain@v1
        with:
          toolchain: nightly-2023-12-30
          components: rust-src
      - name: install rust deps
        run: |
          rustup component add rustfmt clippy
      - name: install ldproxy
        if: ${{ contains(matrix.action.command, 'build')}}
        run: cargo install ldproxy
      - name: Enable caching
        uses: Swatinem/rust-cache@v2
      - name: Run command
        run: cargo ${{ matrix.action.command }} ${{ matrix.action.args }}
      - uses: actions/upload-artifact@v4
        if: ${{ contains(matrix.action.command, 'build')}}
        with:
          name: output
path: target[package]
name = "pkg"
version = "0.1.0"
authors = ["David Garcia <87497958+Dgarc359@users.noreply.github.com>"]
edition = "2021"
resolver = "2"
rust-version = "1.71"
[profile.release]
opt-level = "s"
[profile.dev]
debug = true # Symbols are nice and they don't increase the size on Flash
opt-level = "z"
[features]
default = ["std", "embassy", "esp-idf-svc/native"]
pio = ["esp-idf-svc/pio"]
std = ["alloc", "esp-idf-svc/binstart", "esp-idf-svc/std"]
alloc = ["esp-idf-svc/alloc"]
nightly = ["esp-idf-svc/nightly"]
experimental = ["esp-idf-svc/experimental"]
embassy = [
"esp-idf-svc/embassy-sync",
"esp-idf-svc/critical-section",
"esp-idf-svc/embassy-time-driver",
]
[dependencies]
log = { version = "0.4", default-features = false }
esp-idf-svc = { version = "0.48", default-features = false }
[build-dependencies]
embuild = "0.31.3"
[env]
# ...
ESP_IDF_TOOLS_INSTALL_DIR = { value = "global" } # add this line
[toolchain]
channel = "nightly-2023-11-14" # change this lineWoah, that’s a lot of files… Basically, with this, we can now just download the esp files off of Github, neat.
Wow, we have files now
Ok, so we can flash the esp, cool, we’re gonna use espflash to do that.
The command will look something like this:
espflash flash riscv32imc-esp-espidf/release/<your-release> --monitorcool, next section
The electronics
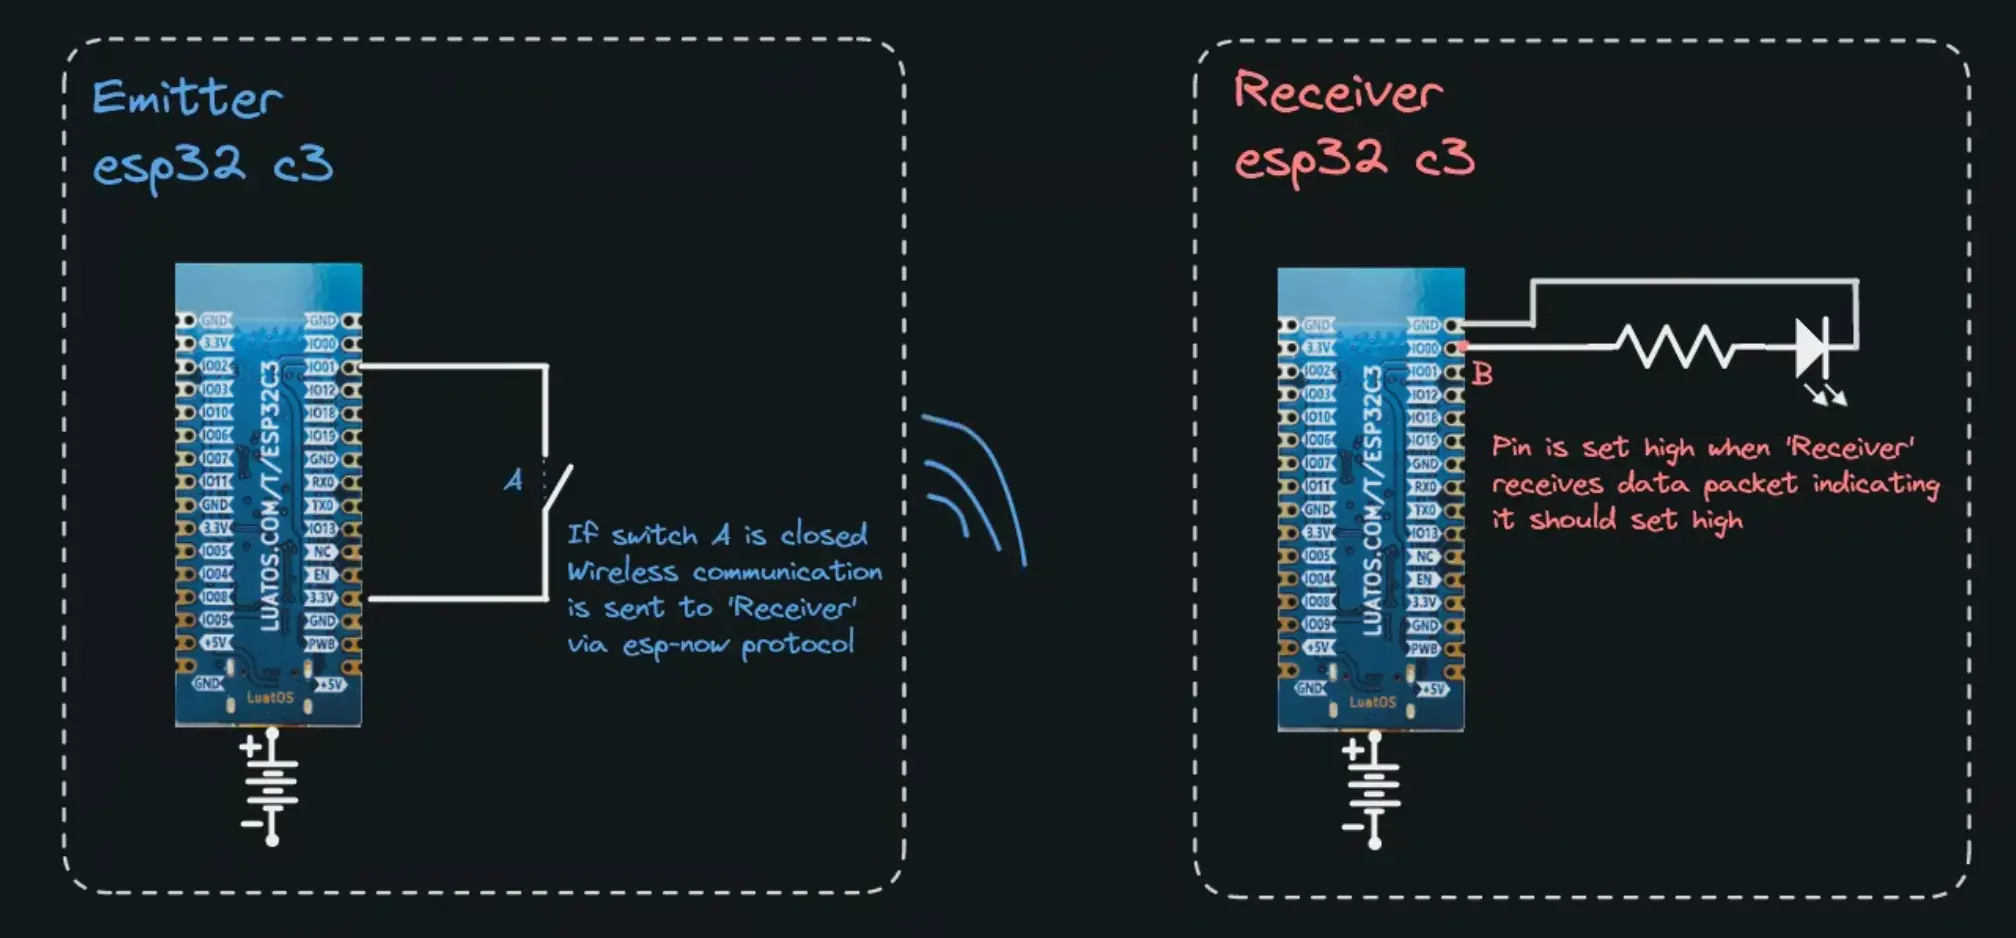
Alright, so here’s the idea with the project. You have two ESP32s. One serves as the controller, the other as the receiver. Wireless communication binds these two together using the esp-now protocol to communicate.
My original implementation is outlined in the Figure 1.1

And here’s a video of that working!!
TODO
The controller sends a signal, which the receiver uses to determine whether or not to turn on an LED. This is obviously a bit simple, but I’m primarily a software engineer. I know how to build computers, but raw electronics are a different beast.
The eventual goal is to turn these two ESPs into a controller / rover combination.
The receiver ESP will drive a variety of motors and the controller will send commands to drive those motors.
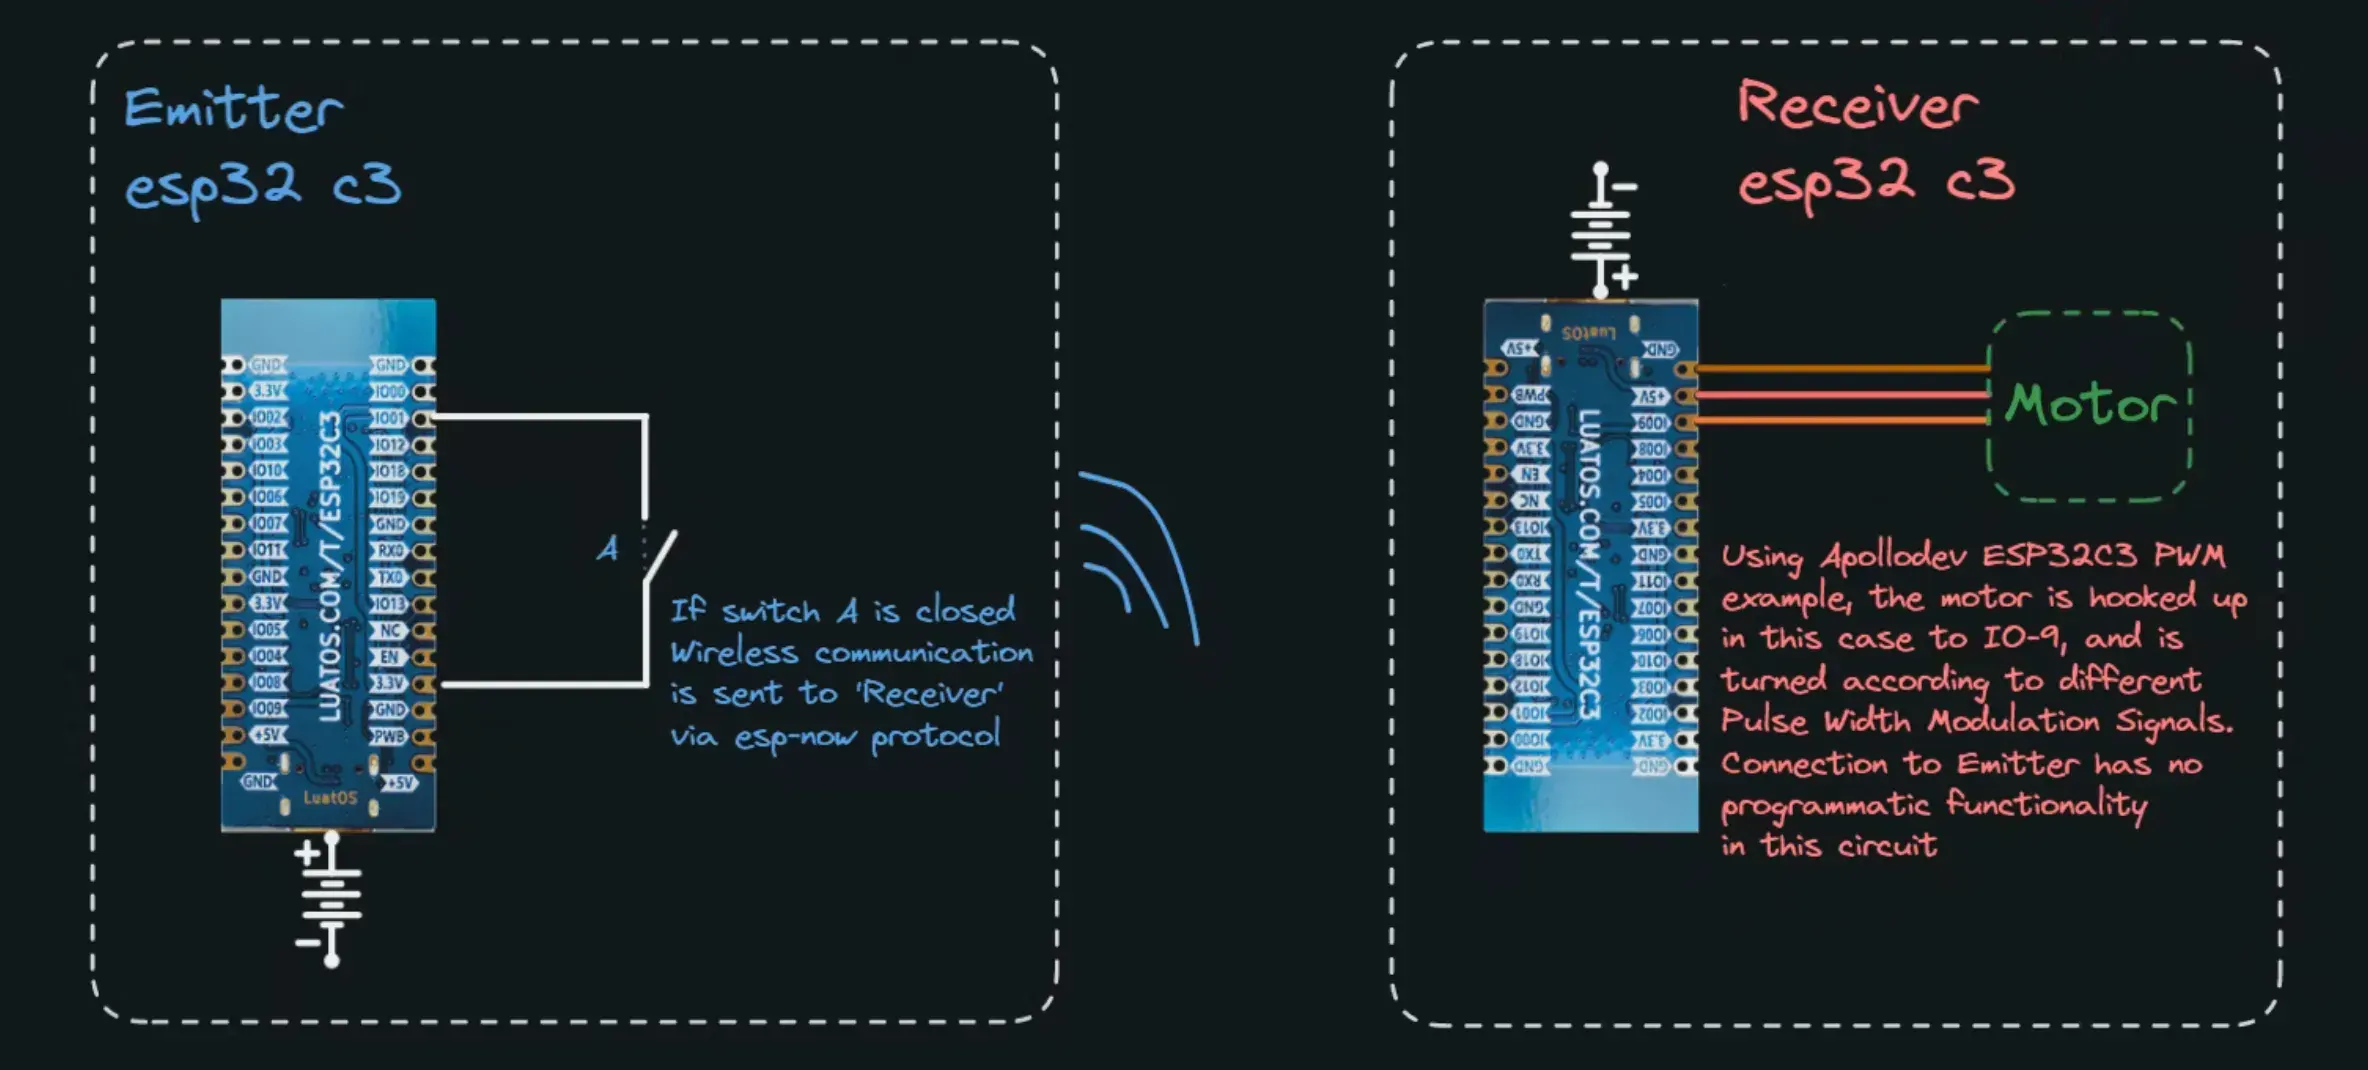
Here’s the most up-to-date circuitry diagram, including the latest motor:

In this case, the SG90 servo motor expects an analog signal on its control wire. This is because varying voltages correspond to different angles on our servo motor. In the embedded systems world, there’s certain micr-ocontrollers that don’t have analog output pins (including ours, woah!), and so, the convention is to turn a digital pin on and off at a specific interval. This is our modulation, where the pin is turning on and off, the pulse is the 1 signal being sent out of the pin, and the width is the length that signal stays as 1, before switching back down to 0.
What does this accomplish?
The modulation in our voltage is pulsing out a fixed voltage, but only for a small window of time, what happens here is that by introducing this variance, our average voltage into the motor starts dipping lower and lower from 1, and ends up somewhere in between 0 and 1.
In this context, a duty cycle is important. A duty cycle indicates what percentage of the specified time window the digital pin is on at logical high. Via our code, we will instrument our duty cycle with a starting frequency, percentage, and resolution.
I had to do a lot of research on how PWM works. In the reference section, there’s a wiki link to pulse-width-modulation and also a link to an article on dev.to that outlines similar information, dedicated to the esp32c3. Special thanks to my friend Alex, who’s always willing to answer my dumb questions. He did an excellent job of explaining this to me and also helping me understand how the calculations work.
But how DOES Pulse Width Modulation work?
Check out this blog which does a great job breaking it down
| Legend |
|---|
| - frequency (Hz) |
The first thing we need to answer is, how fast can our processor clock at? In this case, I don’t think we need to be concerned with our processor clock ceiling, since the ESP32 c3 can clock up to 160 MHz. For the purposes of controlling a servo, we only need about 50 Hz.
But why 50 Hz? That feels like a magic number! You might be asking yourself, or me, or the screen, or the world.
I had the same question. We need to remember that with Hertz we’re talking cycles per second. If we say 50 Hz, that gives us 50 cycles per second.
let’s take a step back to how our servo works. According to this datasheet, the sg90 servo motor requires the following pulse lengths for the various positions:
| Position | Pulse Length |
|---|---|
| 0 (middle) | 1.5 ms |
| 90 (max right) | 2 ms |
| -90 (max left) | 1 ms |
Ok, so, with these values, we know how long our pulse widths need to be. Now here’s where we can get to our value of 50 Hz.
We want a modulation period that makes it easy for us to divide the ms how we need, at 50 Hz, 50 modulations per second means that our period is calculation like this:
With this, it makes it a pretty simple calculation for us when we need to set the duty cycle of the PWM. For someone concerned with using the motor, they’ll simply just want to declare the angle they want the motor arm to turn to. That’s where Omar Hiari’s map function comes in handy:
fn map(x: u32, in_min: u32, in_max: u32, out_min: u32, out_max: u32) -> u32 {
    (x - in_min) * (out_max - out_min) / (in_max - in_min) + out_min
}
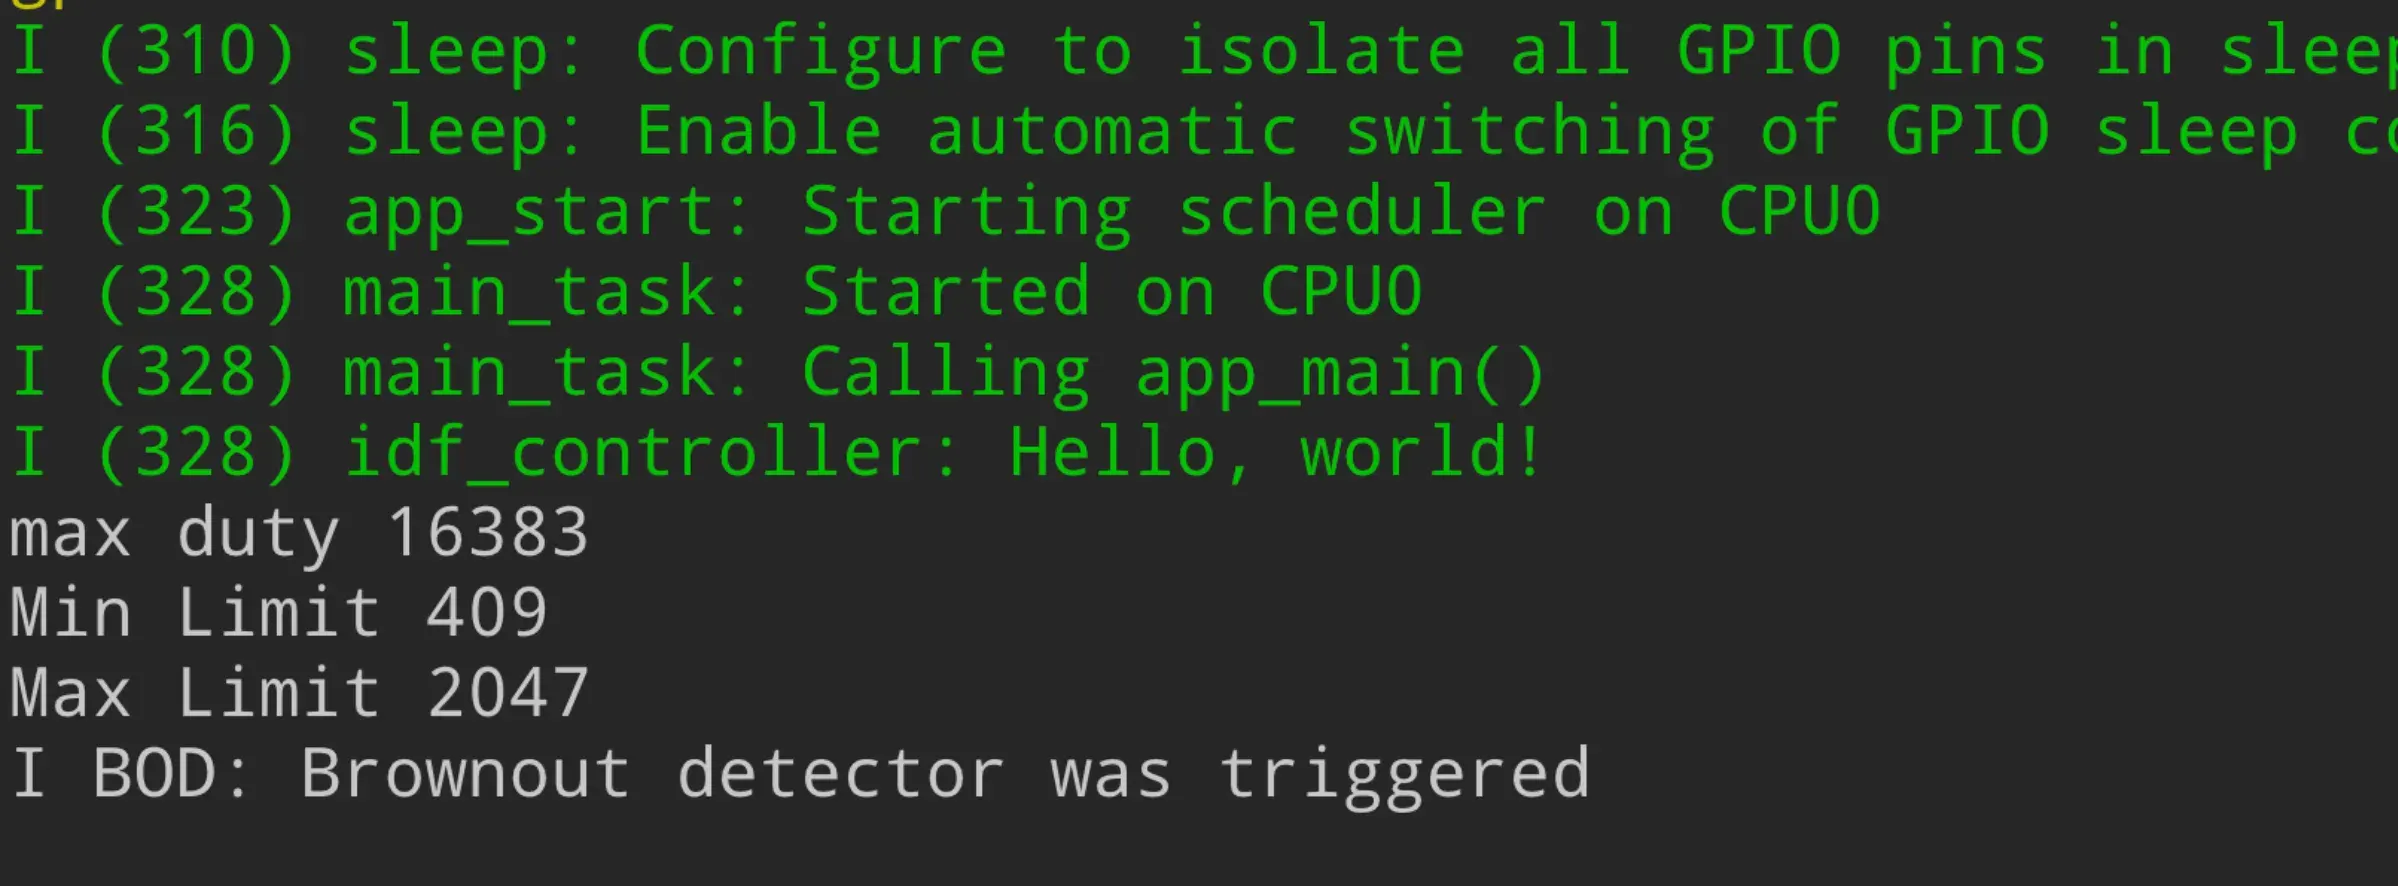
Keep in mind that this function requires you to get an accurate read of your max duty, and presupposes that you’ve done your max and min limit calculations for your PWM correctly.
However, given an angle , we can map it to the appropriate pulse width.
Ok, so we understand PWMs, this is necessary in order to drive our servo motor. The servo motor is going to be used to steer the vehicle, and so we want fine control over what angle the motor turns to.
Eureka!
Having understood all of the above, we move into actually flashing the ESP and seeing the dang motor move. Bear in mind that this may be a 5 minute read for you, but I spent hours hoping and wishing for this moment. Well, it finally arriveed! Keep in mind, the circuitry says that I connected the motor to the 5v, ground, and IO-0 for control. I think the control pin is the mistake that was the final nail in the coffin for what you’re about to see.

So, I set the PWM pin to be IO-0, which, referencing the pinout for the luatOS ESP32-c3 board, tells us that’s NOT a PWM pin…
So, brownout, and a potentially non-functional USB, but the MOTOR MOVED! who cares if the board is fried, the motor moved! !!! it’s hard to express the euphoria of getting the damn thing working finally.
The motor is currently stuck angled at 68 degrees, but I’ll try resetting its position at some point. Along with that, next steps also include doing the wiring right, and testing out the motor with the proper PWM pin.
The saddest part of all of this is that I was able to get this stupid servo moving in 5 minutes with an arduino mega example project. But, I wouldn’t have been able to do it in rust, or learn as much as I did, so take that Leonardo DiCaprio.
References
- https://github.com/esp-rs/esp-idf-hal
- https://github.com/esp-rs/esp-idf-template
- https://github.com/esp-rs/esp-idf-hal/blob/master/examples/ledc_simple.rs
- https://en.wikipedia.org/wiki/Servo_control
- https://docs.rs/embedded-hal/latest/embedded_hal/pwm/trait.SetDutyCycle.html
- https://github.com/bjoernQ/bleps/blob/1e35e76352dc37459bdf97d3dd266ca88741207e/bleps/src/att.rs#L28
- https://www.youtube.com/watch?v=n8g_XKSSqRo
- https://github.com/esp-rs/esp-hal/blob/main/examples/src/bin/blinky.rs
- https://docs.esp-rs.org/esp-hal/esp-hal/0.17.0/esp32c3/esp_hal/ledc/index.html
- https://dev.to/apollolabsbin/esp32-embedded-rust-at-the-hal-pwm-buzzer-5b2i
- https://github.com/apollolabsdev/ESP32C3/tree/main
- https://www.youtube.com/watch?v=QbgTl6VSA9Y
- https://www.youtube.com/watch?v=qJC1nt_eJZs
- https://github.com/Rahix/avr-hal
- https://github.com/rust-lang/rust-analyzer/issues/14205
- https://github.com/rust-lang/libc/pull/3658
- https://github.com/esp-rs/esp-idf-svc/issues/366
- https://github.com/rust-lang/rust-analyzer/issues/16552
Signed